Hi, welcome to this post on Windows SSH Key Location and How To Generate SSH Host keys. You know Security is the name of the game, and host keys are the MVP. In this guide, I’ll show you how to generate your very own set of host keys that’ll make your server as secure as Fort Knox. Don’t worry if you’re new to this; I will hold your hand every step and ensure you have a good time. I will explain SSH host keys, why they’re so important for keeping your server’s secrets safe, and how to generate them. I will also give you a rundown of the different types of host keys (RSA, DSA, ECDSA) and when to use them. And I will show you how to configure your SSH daemon and client to use the host keys, and even throw in some tips and tricks to make it all a breeze. By the end of this guide, you’ll be a host key-generating machine! So, let’s get started!
How To Generate SSH Host keys
Requirements:
Before we get started on generating those fancy host keys, let’s make sure I have all the necessary tools and access. You will need some software to do the job and access to the server where the keys will be generated. Don’t worry, I will give you a list of everything you need so you can go shopping. And while you’re at it, why not grab some snacks too? Trust us, generating host keys can be quite the process, and having some snacks on hand will make it all the sweeter.
So, gather your tools, snacks, and access and let’s move on to the next step, generating those host keys!
Here are some commonly used software that can be used to generate SSH host keys:
- OpenSSH: This is a free and open-source implementation of the SSH protocol. It is widely used and comes pre-installed on many Linux and Unix-based systems. It includes the ssh-keygen utility which can be used to generate SSH host keys.
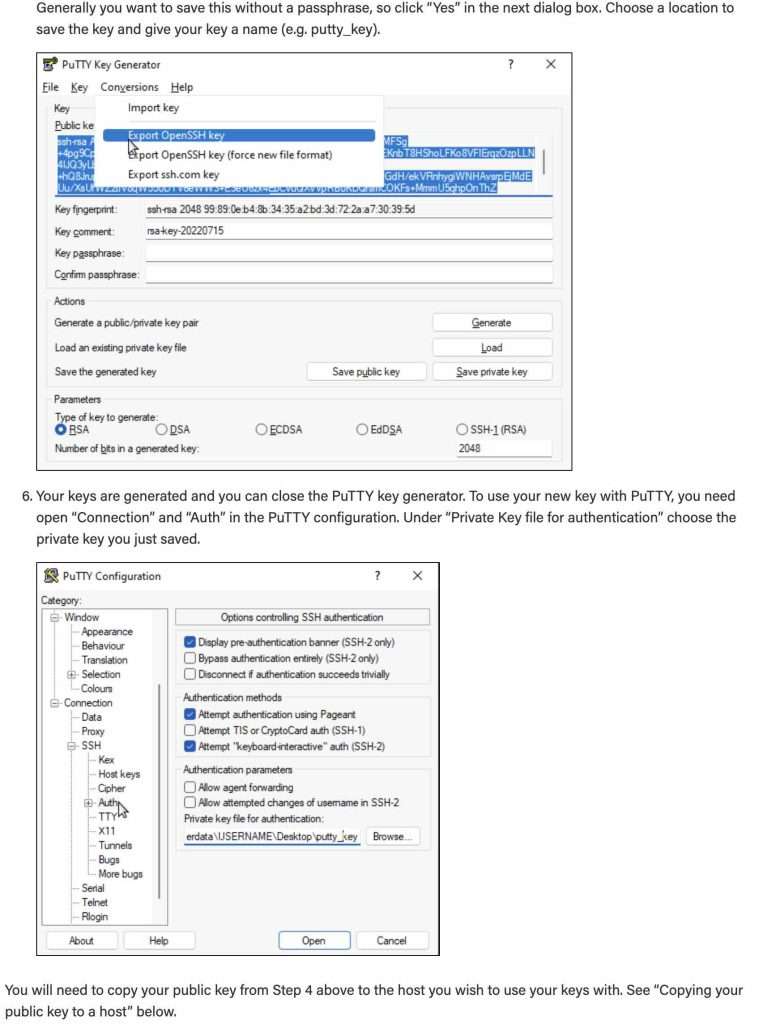
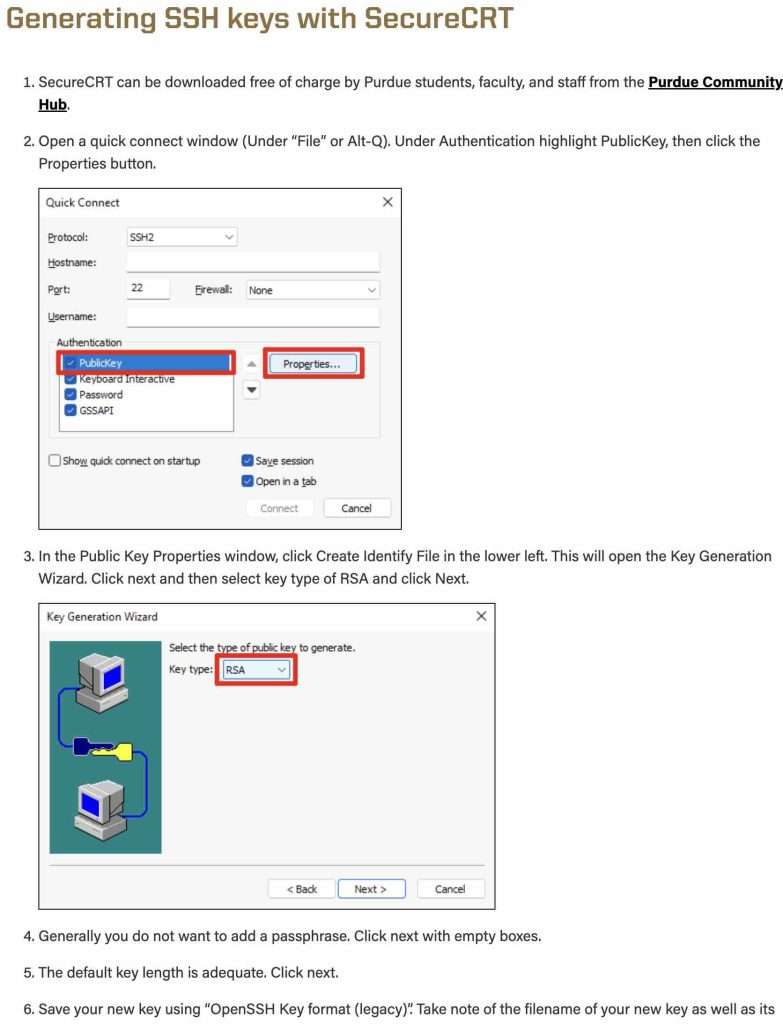
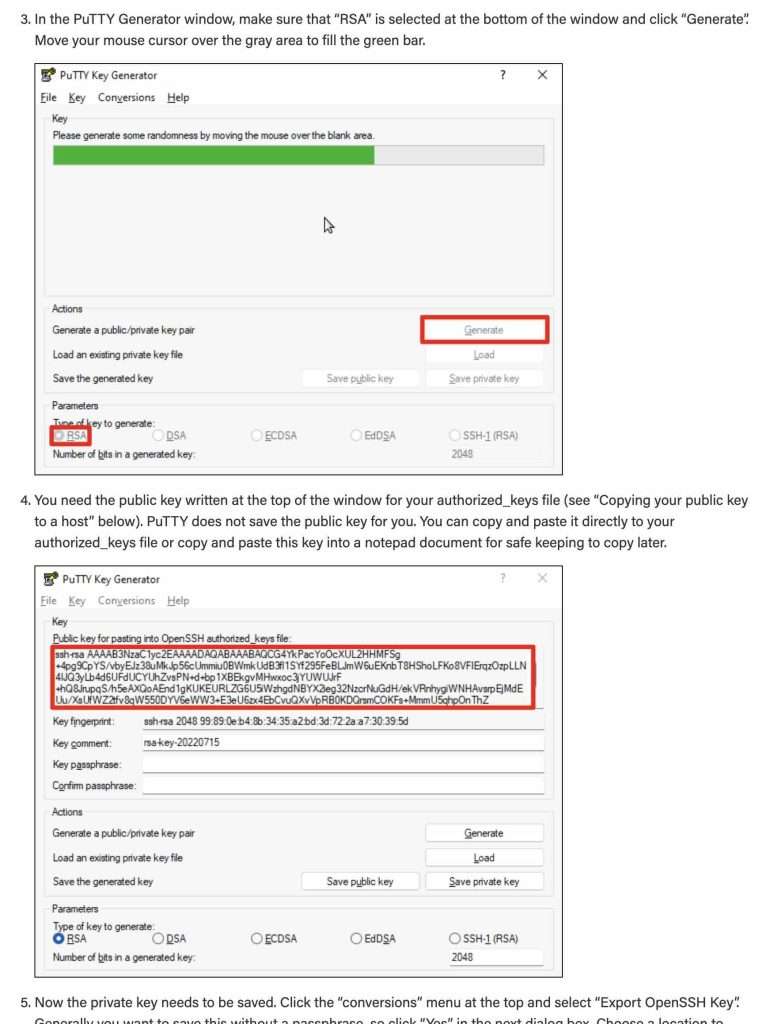
- PuTTYgen: This is a key generator tool for the PuTTY SSH client. It can be used to generate RSA, DSA, ECDSA, and Ed25519 keys.
- ssh-keygen on Windows Subsystem for Linux (WSL): Windows Subsystem for Linux (WSL) is a compatibility layer for running Linux binary executables natively on Windows 10. You can use ssh-keygen to generate SSH host keys.
- ssh-keygen on Git Bash: Git Bash is a command-line utility that provides a Linux-like environment on Windows. It includes the ssh-keygen utility which can be used to generate SSH host keys.
- ssh-keygen on Cygwin: Cygwin is a Unix-like environment and command-line interface for Microsoft Windows. It includes the ssh-keygen utility which can be used to generate SSH host keys
It is suggested to use OpenSSH as it is widely used and it is pre-installed on many Linux and Unix-based systems. Note that some of the above options are for Windows users, as OpenSSH is not natively available on Windows.
Generating SSH Host Keys
Now that you have all the necessary tools and access generating those shiny new host keys is time. Don’t worry, I will guide you through every step of the way, and it’s going to be as easy as pie.
Step 1: Choose the key type: SSH host keys come in different types, such as RSA, DSA, and ECDSA. Each type has its own set of benefits and use cases, so it’s important to choose the one that best suits your needs. I will give you a brief explanation of each type and help you decide which one to use.
Step 2: Set the key size: The key size determines the strength of the encryption used in the host key. The larger the key size, the more secure the host key will be. I will explain the recommended key size for each type of host key and show you how to set it.
Step 3: Generate the host key: Once you’ve chosen the key type and set the key size, it’s time to generate the host key. I will walk you through the process and make sure you don’t miss a step.
And voila! With those easy steps, you’ll have your very own host key that’ll keep your server secure as can be. Now, let’s move on to configuring those host keys.
Configuring SSH Host Keys
Alright, I’ve got our shiny new host keys, now it’s time to put them to work! But don’t worry, this step is just as fun as the last one. I will show you how to configure your SSH daemon and client to use the host keys and make sure everything is running smoothly.
Step 1: Configuring the SSH daemon: Show you how to configure your SSH daemon to use the host keys and make sure your server is ready to roll.
Step 2: Configuring the client: I will show the steps below
Step 3: Double-check the configuration: We’ll look at tips and tricks to make sure your configuration is spot on, and your connection is secure.
And that’s it! With these steps, you’ll have a secure connection and your host keys will be working like a charm! Now you can rest easy knowing that your server is protected from any unwanted visitors.
Step 1: Configuring the SSH daemon:
The exact code and steps to configure the SSH daemon to use host keys will vary depending on the operating system and SSH software you are using. Here is an example of how to configure the SSH daemon on a Linux system using OpenSSH:
- Open the SSH configuration file:
sudo nano /etc/ssh/sshd_config - Locate the line that starts with
#HostKey /etc/ssh/ssh_host_rsa_keyand uncomment it by removing the#at the beginning of the line. - Repeat step 2 for the lines starting with
#HostKey /etc/ssh/ssh_host_dsa_keyand#HostKey /etc/ssh/ssh_host_ecdsa_keyif you have generated keys for those types. - Save the changes by pressing
CTRL+X, thenY, thenENTER - Restart the SSH daemon for the changes to take effect:
sudo service ssh restart
Please note that the code here is just an example and the exact location of the ssh config file may vary based on your operating system. Also, you may need to adjust the path of the ssh host key files based on where they are stored on your system. It is always recommended to keep backup of the original config file before making any changes to it.
Also, it’s worth to mention that the above instructions are for Linux systems. If you are using Windows or another operating system, the process may be different. If you have any issues, you can check the documentation of your operating system or SSH software.
Step 2: Configuring the client:
Here is an example of how to configure the OpenSSH client on a Linux system:
- Open the SSH configuration file:
nano ~/.ssh/config - Add the following line to the file, replacing
server_ipwith the IP address of the server you wish to connect to:
Code is:
Host server_ip HostKeyAlgorithms ssh-rsa- Repeat step 2 for each server you wish to connect to and for other host key algorithms you have.
- Save the changes by pressing
CTRL+X, thenY, thenENTER - Now, when you try to connect to the server using the command
ssh server_ipthe client will use the ssh-rsa algorithm to connect.
Step 3: Double-checking the configuration.
Here are some tips and tricks to double-check your SSH host key configuration and ensure a secure connection:
- Verify the host keys on the server: Use the command
ssh-keyscan server_ipto retrieve the server’s host key and compare it to the key stored on the client. Make sure they match. - Check the SSH daemon logs: Make sure the SSH daemon is running and that there are no errors in the logs. On Linux systems, you can check the logs by running the command
tail -f /var/log/auth.log - Test the connection: Try connecting to the server using the SSH client and make sure the connection is established without any warnings or errors.
- Disable password authentication: In the ssh config file on the server side, you can disable password authentication and only allow key-based authentication by adding the following line:
code is:
PasswordAuthentication no
- Check for the latest updates: Keep your SSH software and operating system up to date. This will help to ensure that any security vulnerabilities are patched.
By following these tips, you can ensure that your configuration is correct and your connection is secure. If you encounter any issues, you can refer to the documentation of your SSH software or operating system for further assistance.
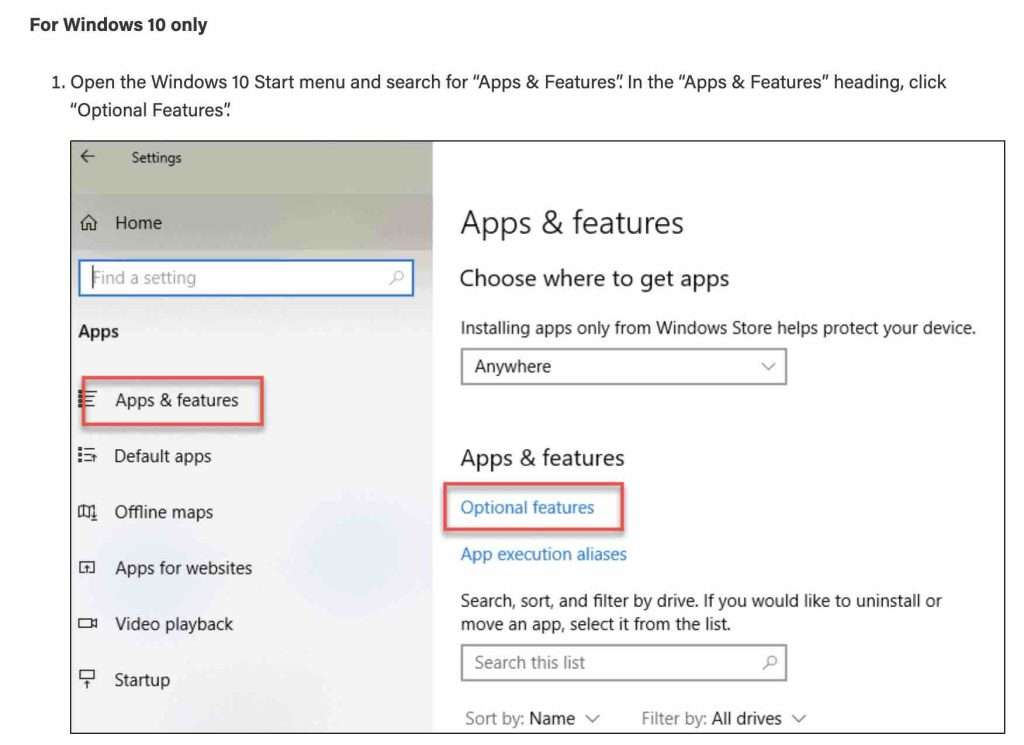
Windows SSH Key Location
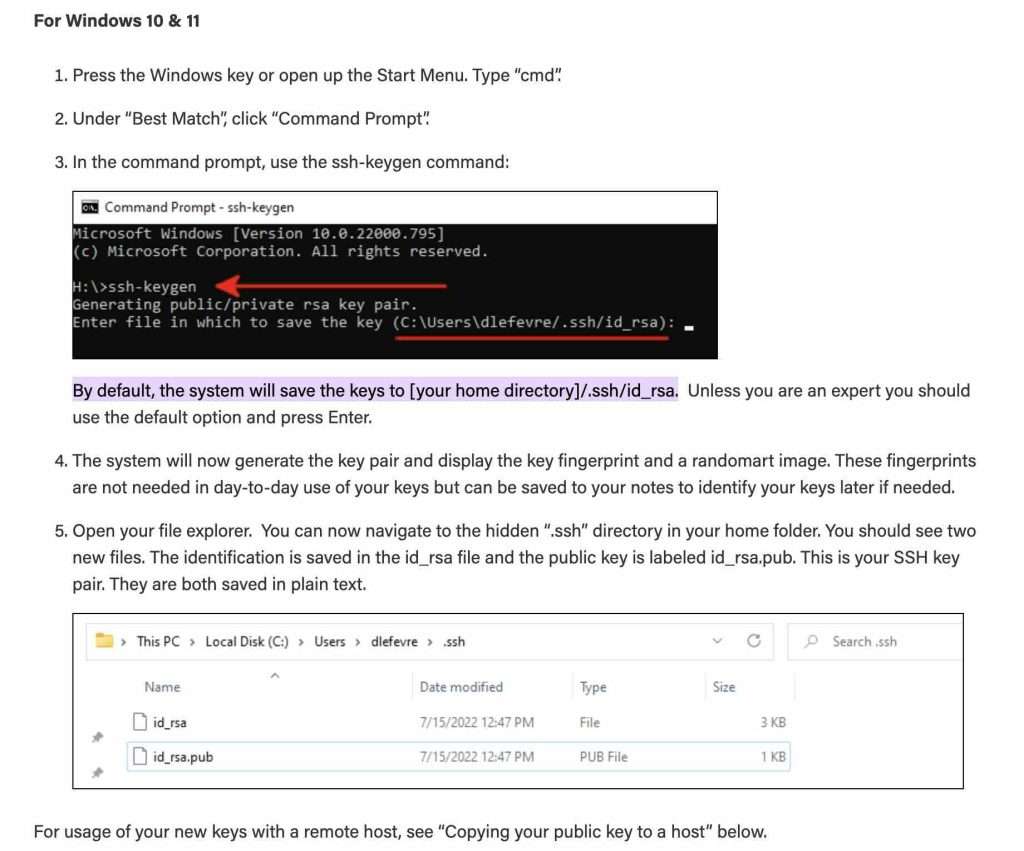
Window’s system will, by default, save the SSH keys to [your home directory]/.ssh/id_rsa.
Conciliation:
You’ve made it to the end of our guide, and you’re now a master at generating and configuring SSH host keys. I hope you had as much fun reading this as I did writing it. Windows SSH Key Location and How To Generate SSH Host keys.
Other post: